An Extremely Simple Docker, Traefik, and Python FastAPI Example
In many ways, containerization, especially using Docker and Kubernetes, despite the added complexity, has become the go-to solution for software development and deployment. Fortunately, containers are also used more and more within the context of reproducible research.
If you have looked at some containerized applications, especially if multiple containers and microservices are involved, you probably have come across Traefik (technically Traefik Proxy) at some point. Traefik is a popular open-source edge router and (reverse) proxy designed for the cloud.
To put it simply, Traefik takes requests from outside, usually the web, and cleverly routes them through to your containers and services. In this regard, it can be seen as an alternative to something like NGINX. However, while there are alternatives, it has become very popular because of some quite magical features such as automated Let’s Encrypt support, service detection, and load balancing.
While Traefik is not super complicated, I initially had quite a few problems getting the hang of it. I still often do… What would have helped me most would have been an extremely simple, straightforward example to get me going. Hence, in this post, I will be providing such an example based on a toy application (written in Python and FastAPI), Docker, and Traefik. While this example is based on Python, the Docker and Traefik components are more or less universal for all languages.
If you want to play along, you will need Docker (e.g. Docker Desktop) on your system. Then, clone the GitHub repository and you should be good to go!
The Toy Application
Please be aware that this example does not demonstrate (the absolutely fantastic) FastAPI or any containerization best practices. I deliberately designed a toy architecture that is overly simplistic to demonstrate some fundamental principles and to create a copy-pastable example.
Overview
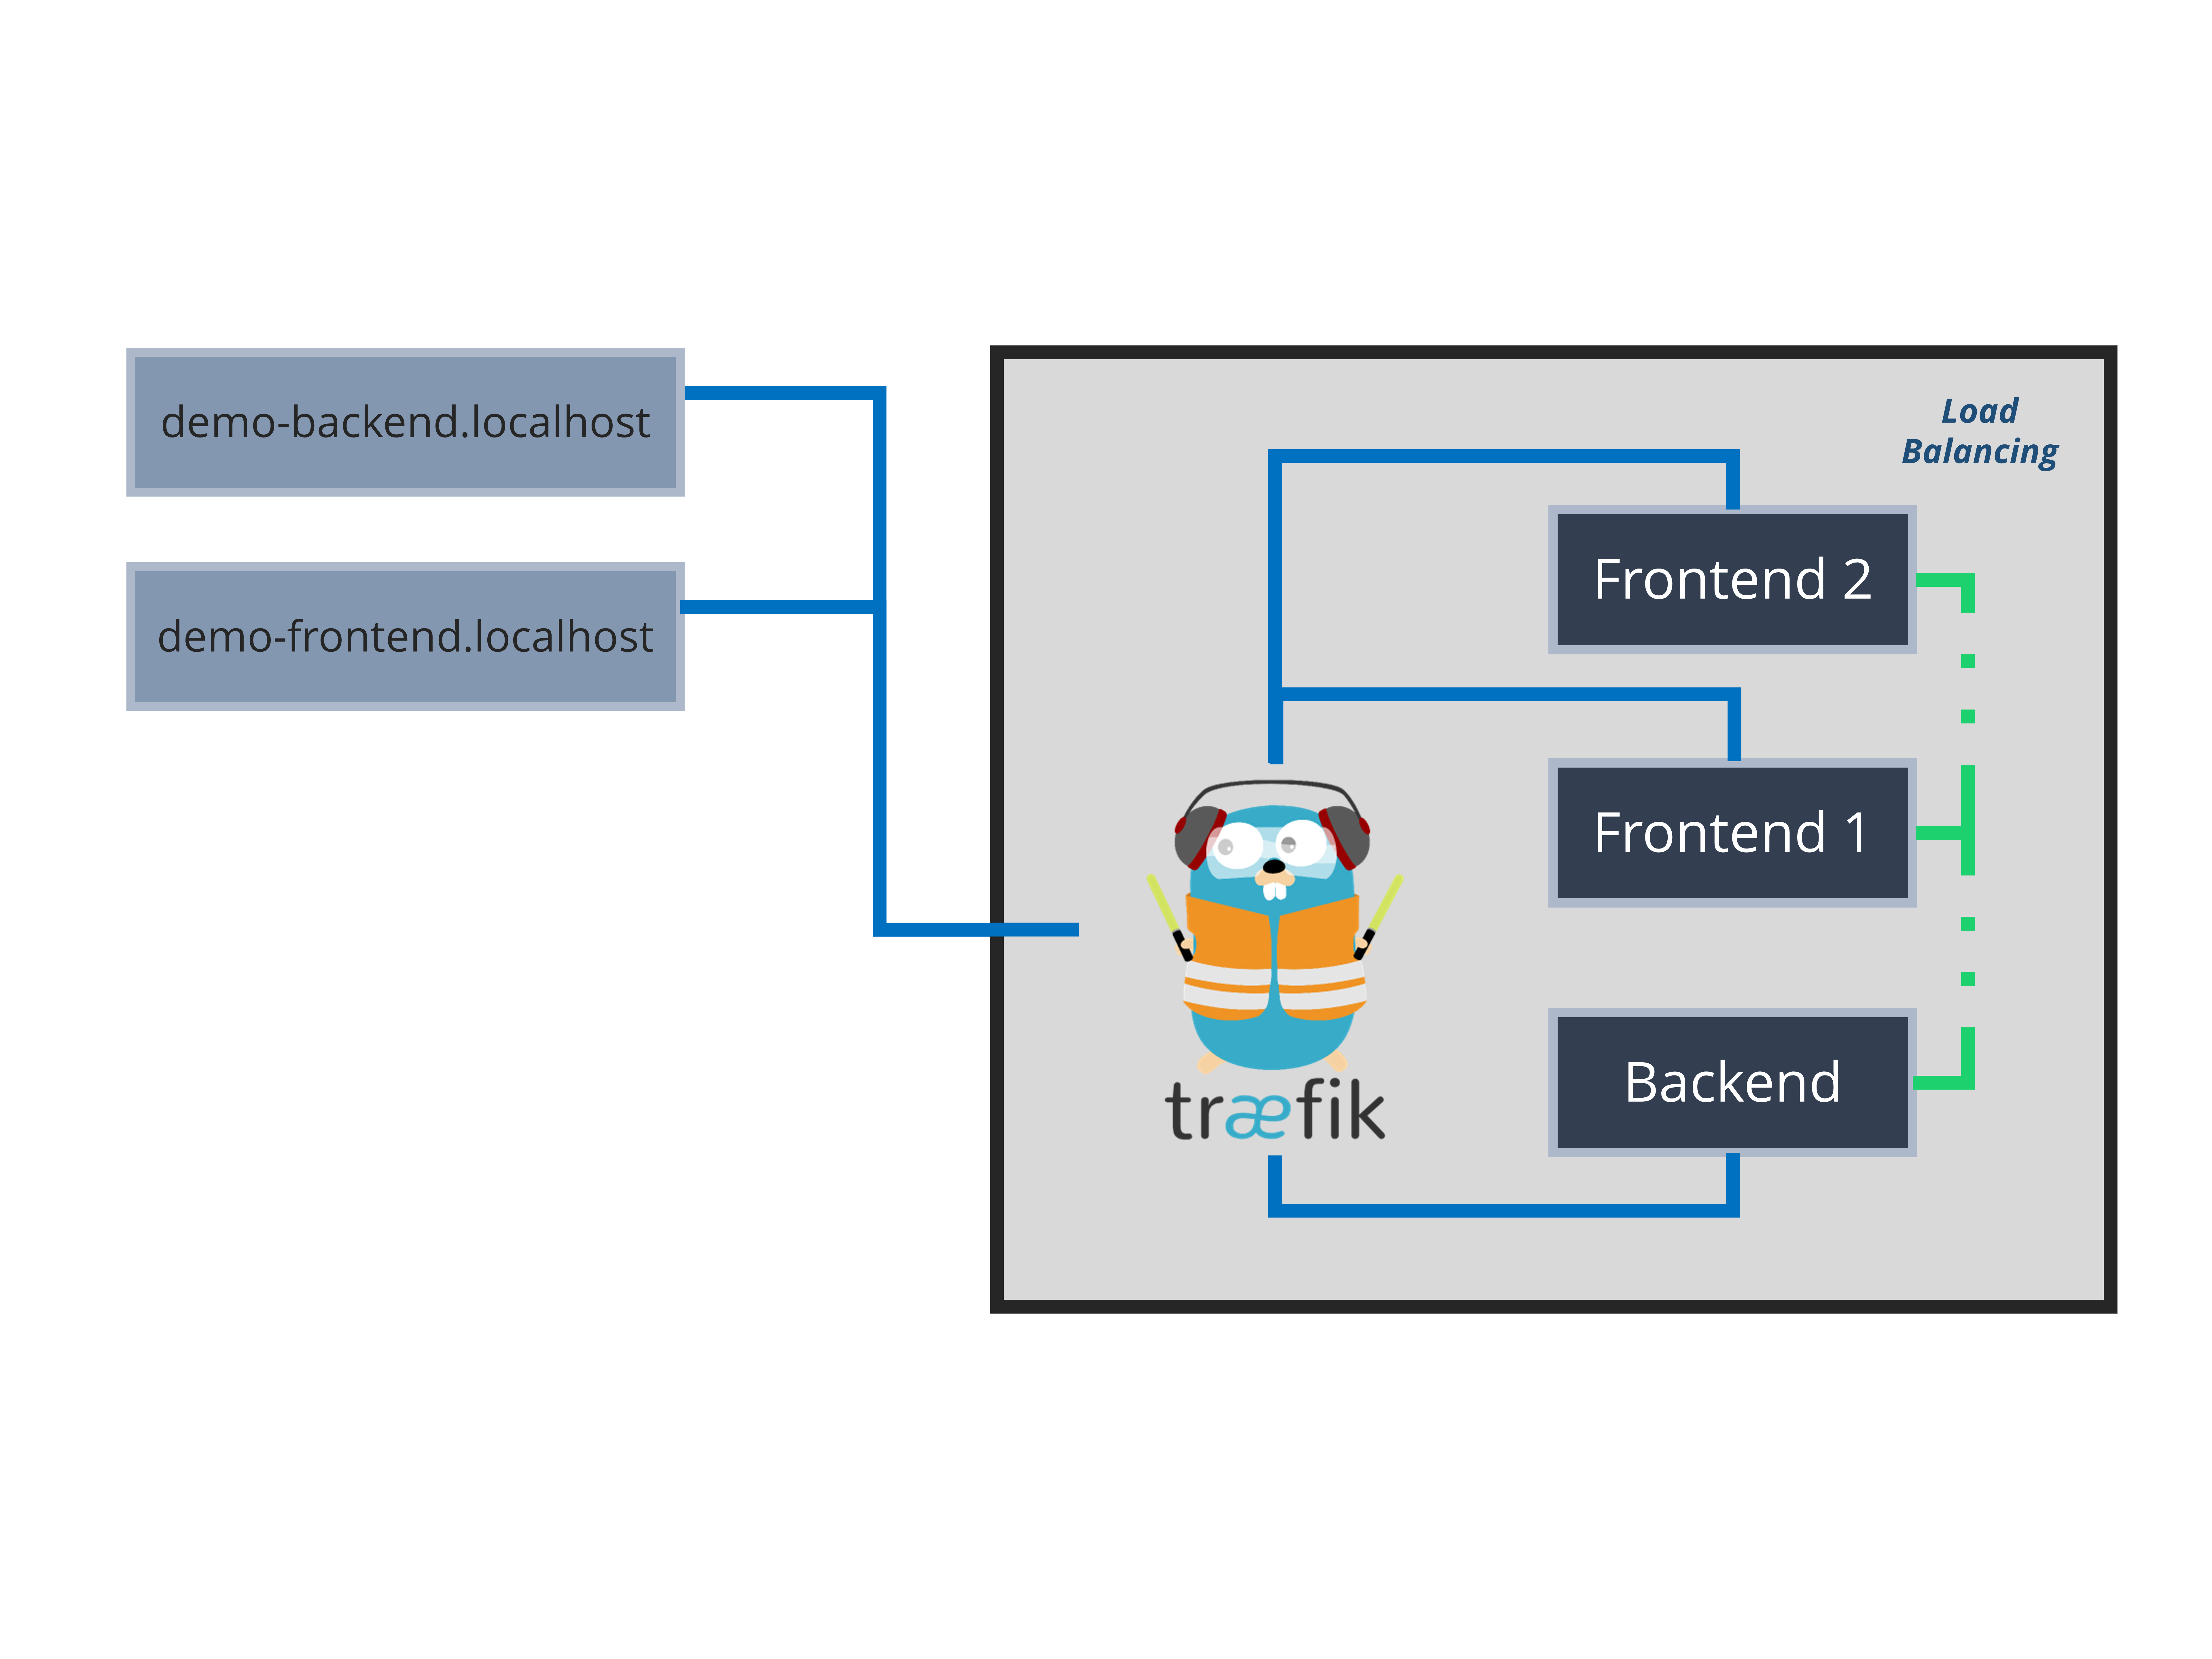
The example application will consist of a frontend service and a backend service (a very rudimentary key-value store). The only purpose of the frontend is to grab and display the data stored in the backend via HTTP. The backend has one endpoint (GET and POST) that allows us to retrieve the data as well as to add new information to the store. To make things more interesting, we will have two frontend instances that are load-balanced.
Two Python / FastAPI Services
In order to understand this example, you do not necessarily need to know FastAPI. Also, the way I am using the library here does not give it any justice!
Basically, the only thing you need to know for now is that functions decorated with @app.HTTP_METHOD('/route') will create a new API route or endpoint users can interact with using HTTP. If you know Flask or ExpressJS this should be rather familiar to you.
Backend Service
The backend stores data (key-value pairs) in a dictionary called store. The default route / will simply return the content of this dictionary. If we receive a POST request, we will add/update the store dictionary before returning the data in question.
from fastapi import FastAPI
from fastapi.responses import JSONResponse

app = FastAPI()

store = {
    'demo': 'this is important data!'
}

@app.get('/')
def read_keys():
    return store

@app.post('/')
def create_key(key: str, value: str):
    store[key] = value
    return {key: store[key]}
Backend: app/main.py
Frontend Service
The frontend service looks almost identical to the backend. However, we only have one GET route / which will use requests to get the data from the backend before, very crudely, displaying it to the user.
There are two things you should take note of: Firstly, we are generating a random instance_id which we later will use to identify our current instance after load-balancing. This is not necessary, but hopefully helps with understanding having multiple instances, i.e., containers.
Secondly, we are requesting data from http://backend. Since both, the backend and the frontend, will run as containers in the same Docker network, we are referring to the backend container’s name here instead of a fixed API server address (requests.get('http://backend')).
import requests
import json
import random

from fastapi import FastAPI

app = FastAPI()

instance_id = str(random.randint(0, 1000))

@app.get('/')
def main():
    r = requests.get('http://backend')
    data = json.loads(r.content)
    data['frontend_instance'] = instance_id

    return data
Frontend: app/main.py
Containerization
Demo of the Application
In the short video above, you can have a look at the application after running docker-compose up --scale frontend=2. Let’s get there step by step:
Ultimately, we will have the following folder structure:
- frontend
- /app/main.py
- Dockerfile
- backend
- /app/main.py
- Dockerfile
- docker-compose.yaml
(see GitHub Repository)
First, we will have to create Docker images for our two services. Luckily, there is a fantastic base image for working with FastAPI by Sebastián Ramírez. Therefore, we can use the following, very simple, Dockerfile for both applications:
FROM tiangolo/uvicorn-gunicorn-fastapi


COPY ./app /app
Dockerfile for both Frontend and Backend
Under the hood, this image uses Uvicorn to run and manage the Python application. The folder structure, as seen above, is mandated by this base image.
Now, to create the images, within frontend (and within backend respectively) we will run docker build -t demo-frontend . which will create a Docker image named demo-frontend. Repeat the same for the backend service.
Finally, we will create a docker-compose.yaml file to orchestrate everything. This is where Traefik comes into play.
In the file below, we define three services (reverse-proxy, frontend, and backend). Having the Traefik service (reverse-proxy) will allow us to use labels for the other services indicating that we want these to be routed by Traefik. Aside from our three services, we will also create one network (demo-net) on which all services will run.
Please note that this is the most basic use-case and we are not requesting Let’s Encrypt certificates. Everything will run locally using just HTTP and on the *.localhost host.
version: "3.8"
services:
  reverse-proxy:
    image: traefik:latest
    command:
      - "--api.insecure=true"
      - "--providers.docker=true"
      - "--entrypoints.web.address=:80"
    ports:
      - "80:80"
      - "8080:8080"
    networks:
      - "demo-net"
    volumes:
      - /var/run/docker.sock:/var/run/docker.sock:ro

  frontend:
    build: ./frontend
    image: demo-frontend
    networks:
      - "demo-net"
    labels:
      - "traefik.enable=true"
      - "traefik.http.routers.frontend.rule=Host(`demo-frontend.localhost`)"
      - "traefik.http.routers.frontend.entrypoints=web"

  backend:
    build: ./backend
    image: demo-backend
    networks:
      - "demo-net"
    labels:
      - "traefik.enable=true"
      - "traefik.http.routers.backend.rule=Host(`demo-backend.localhost`)"
      - "traefik.http.routers.backend.entrypoints=web"

networks:
  demo-net:
docker-compose.yaml
If you look at the example above, there are five main things to understand:
- We do not specify ports for our services as Traefik will autodiscover the exposed port. If there are multiple exposed ports, a little extra configuration would be needed.
- Since all services are in the same network (
demo-net), service names are being resolved by Docker. Hence, we are able to use http://backend as an endpoint. Internally, backend will then be resolved to the correct address of the service container. - We use the
traefik.http.routers.backend.rulelabel to specify under which name (address) we want to access our services. Here, even though we don’t necessarily need to, we are exposing both services to the outside world. The entrypoint (hereweb) defines which ports will receive outside traffic. Since we’re running on HTTP this will be 80. - The
--api.insecure=truecommand will give us direct and unprotected access to the dashboard running on port 8080. - The
/var/run/docker.sock:/var/run/docker.sock:rovolume assignment is not necessarily recommendable. However, without it, there are sometimes problems with running everything on Windows.
Ultimately, you should now be able to bring everything up using docker-compose up --scale frontend=2. You will now be able to find the frontend at http://demo-frontend.localhost, the backend at http://demo-backend.localhost and the dashboard at http://localhost:8080.
Since --scale will create two instances (containers) of our frontend, we will be able to load-balance. In practice, as you can see in the video above, Traefik will conveniently do this for us without any changes to the configuration. You can also try to spawn more containers – Traefik will adjust automatically.
Of course, we could also have multiple backend services. However, since data is currently stored in memory for each instance, this would lead to some very strange behavior.
Next Steps
Of course, this example is overly simplistic, and you might have one of these What does this have to do with reality?! moments.
You are absolutely right in assuming that this setup is not very helpful in production. However, I strongly believe that having a running setup, even a very simplistic one, is a great starting point for further experimentation and learning. For example, you could now try to get this running on an actual server, with an actual domain, using HTTPS and Let’s Encrypt.
I would suggest you start by trying this on your own first before having a look at this awesome tutorial on deploying FastAPI with HTTPS written by the creator of FastAPI himself.

Thank you for visiting!
I hope, you are enjoying the article! I'd love to get in touch! 😀
Follow me on LinkedIn