How Do You Blur Your Background? My Home Office Video and Audio Setup in 2020
As we all know, 2020, for better or for worse, has been the year of video conferencing, virtual conferences, Zoom classes, and pre-recorded presentations. As educators, at least to a certain extent, our homes (home offices) have become our classrooms, and we all have got a taste of what it means to work remotely.
Fortunately, over the last few years, I have already been extensively experimenting with various video and audio setups for facilitating classes remotely and for recording educational content. Therefore, at least from a technical perspective, I was fortunate, and switching to being fully remote has not been as hard for me as it has been for others.
While my setup, especially when compared to full-time content creators1, is fairly simple, I regularly get asked about my home office video and audio setup. The most common question, hence the title: How do you blur your background?
Therefore, in this short article, I will discuss my current setup and hope that it will inspire at least some people!
❓ In case you are just interested in reliably blurring your background: Download either XSplit VCam or, if you have a recent NVIDIA graphics card, NVIDIA’s Broadcast App. After installing the application, you will have a virtual webcam available that allows you to blur and/or remove your background. This virtual webcam can then be used in any tool, e.g., Zoom, that supports cameras.
February 2021 Update: Since the 5.5.0 update, Zoom supports blurred background out of the box. The approach outlined below still provides additional features but using Zoom natively is certainly easier.
My Personal Requirements
Of course, there is no ideal solution, and there is also no limit to what you could do. Therefore, before going into any details, I want to outline my personal requirements.
Obviously, these requirements will vary vastly between people and depending on the things you want to achieve.
Given my situation, I want …
- decent video and audio quality for both streaming and recording. It does not need to be great, but I still strive for relatively good production quality.
- to be able to blur and/or remove my background. While there is nothing to hide behind me, I like people to focus on me and not on my background. I also want to be able to fully remove my background so that I can add a transparent facecam to my content (chroma keying).
- to be able to add effects, primarily for fun, to my video feed.
- to be able to control my video feed at all times. More precisely, I want to use overlays, switch between cameras, share my desktop, and show arbitrary content as my video feed. This is especially important if I use tools that do not support sharing my screen. In these situations, I want to use my webcam as a screen sharing alternative.
- to be able to use my smartphone as an additional wireless camera.
- to be able to use my Apple iPad as a wireless video source. For example, I want to stream and record my iPad as a digital blackboard or drawing canvas.
- my output resolution, ideally, to be 1080p. I do not need 4k or more than 30 fps.
- to have decent clear audio without building a complex sound setup.
On the other side, I do not want to…
- rely on the specific tools I am using, for example, Zoom’s virtual backgrounds. Instead, I want to use the same video feed across all tools and platforms.
- have a physical green-screen in my room.
- use a secondary streaming/recording computer.
Ultimately, I want my setup to be as simple as possible while fulfilling my basic requirements. I do not want my office to be a studio! Fortunately, even though my current setup is not perfect by any means, I believe that I have managed to fulfill most of these requirements without cluttering everything in hardware.

Three examples of what my video stream looks like.
The image above illustrates the three fundamental things I want to achieve video-wise. On the very left, you can see my default “video conferencing look,” while on the right I added various (augmented reality) effects. This is not something I do regularly, but sometimes I simply enjoy having a little fun with my video stream. In the middle you can see my virtual green-screen. I regularly use this to include a transparent facecam in my videos.
Regular facecam vs. transparent facecam (via chroma-keying).
Although I do not believe that a facecam is necessary in all cases, I often want to include one in my recordings. Personally, I prefer the transparent style to having a ‘video box,’ but that obviously comes down to personal preference. In the short clip above, you can see the difference between my regular video and a chroma-keyed version.
My Current Solution
Now, I will discuss my solution as of December 2020. However, as I am constantly playing around with both hardware and software, this will most likely change rather quickly.
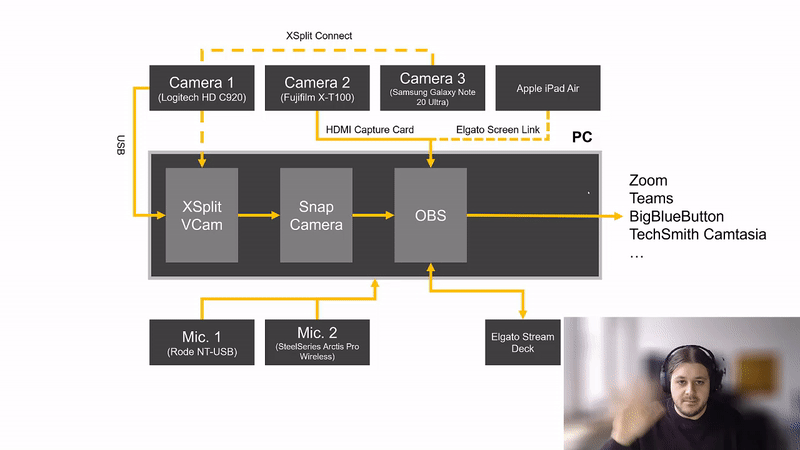
Diagram of my current core setup. (As of Dec. 2020)
Above I have tried to illustrate my current approach. I rely on relatively cheap hardware, and I try to do as much as I can in software to reduce the amount of hardware that clutters my office.
Hardware
Video
For video, I use two cameras as well as my smartphone and a tablet. My main camera is an older Logitech HD C920 webcam. It is a good camera, but I am looking to replace it with a more current model. If I need or want better image quality, I will use one of my ‘actual’ cameras via an HDMI capture card. Currently, I use a FujiFilm X-T100 for that purpose since this is my small, always-in-my-bag camera anyway. If you are looking specifically for a streaming camera, I would not recommend it!
Using XSplit Connect, I can also wirelessly use my smartphone as an additional camera. This is not only useful with regard to image quality, but also as an impromptu document camera2. Generally speaking, I would also recommend using your phone as a camera if you do not have available an external webcam. The additional quality and being able to freely position your camera really pays off.
My Apple iPad, which I heavily use as a blackboard replacement due to the fantastic Apple Pencil, is also connected wirelessly using Screen Link. While this solution does not always work flawlessly, I enjoy not being tethered. That being said I want to emphasize that I would not recommend using virtual cameras to share your screen if there are alternatives. Whenever possible, I try to share my screen as directly as possible. For example, I regularly join Zoom meetings with both my computer and my iPad so that I can share my iPad’s screen directly and not via my camera feed.
In some cases, Screen Link can add a significant lag to the signal. In these cases, I can only recommend Reflector, which is a very robust and user-friendly software screen mirroring solution. It works just like Apple TV or a Chromecast (Miracast) and allows you to mirror your mobile devices to your computer.
When it comes to light, I also do not use anything fancy. Since I have a large window right next to me, I do not regularly use a dedicated lighting setup. However, I keep two cheap Yongnuo YN300 Air LED lights around for situations in which natural light or screen light simply is not enough. Being a photographer, I would love to have better lighting, but currently, I just don’t want to have light stands around me at all times. In the future, I might add an Elgato Multi Mount to ‘hide’ a small LED panel or ring light behind my screen.
January 2021 Update: I have (temporarily) added an Elgato Multi Mount as well as an Elgato Key Light Air to my setup. I do not like the look of my desktop, but I can highly recommend both products despite them being at the higher-end in terms of pricing.
Audio
My audio solution is very straightforward. I use a Rode NT-USB on a Rode PSA1 arm, which is definitely worth the extra money. This is very simple, but I am more or less content with the audio quality, and I like not having to use any external audio interfaces. Usually, I will use my headset’s (SteelSeries Arctis Pro Wireless) microphone as a backup audio solution.
Miscellaneous
Of course, there are various bits and pieces that are not directly related to audio and video. The two most important things are my Elgato Stream Deck to control OBS (see below) and a silent keyboard.
While I love using clicky mechanical keyboards, they are quite bad when it comes to recording, and so I keep a simple wireless keyboard around to use while presenting.
Software
Video
As I said before, I try to do most things in software. The key to everything, at least in my case, are virtual webcams. The idea is straightforward: A piece of software takes a video signal and emulates a webcam. This virtual ‘camera’ can then be used in any application that supports cameras, including all (well, most3) video conferencing and screencasting tools.
In my setup, my primary video signal (Camera 1) is piped through three pieces of software before it ends up in, for example, a Zoom call.
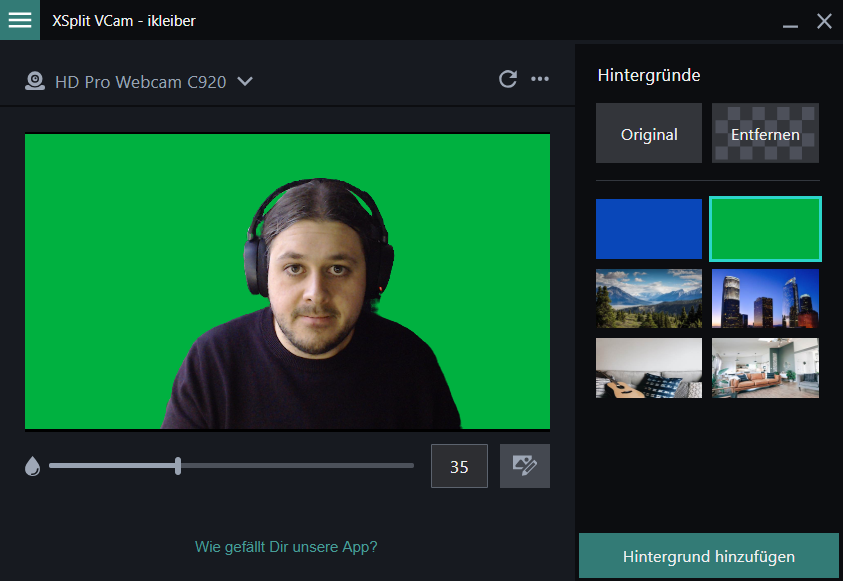
Screenshot of XSplit VCam
The first and most important tool in this pipeline is XSplit VCam4. This tool takes the signal of my physical camera and either blurs or removes the background before making available this new image as a virtual webcam. While, as you can see, VCam supports outputting a transparent background, many tools, including TechSmith Camtasia do not support this. Therefore, I often replace my background with a solid color (green or blue) and then use chroma-keying down the line. In addition, XSplit VCam, together with XSplit Connect allows me to easily use my smartphone as an additional camera.
After the background has been taken care of, I pipe my video signal into Snap Camera (well, not all the time). This allows me to add both useful and fun filters before, again, creating a new virtual webcam.
Now, finally, I will use this virtual webcam in OBS Studio. In OBS, all my cameras and video signals, including my iPad footage, come together. Here, I can add overlays, change cameras, and add arbitrary content to my video stream. I then finally use OBSs virtual camera as the input for all of my recording and conferencing tools.
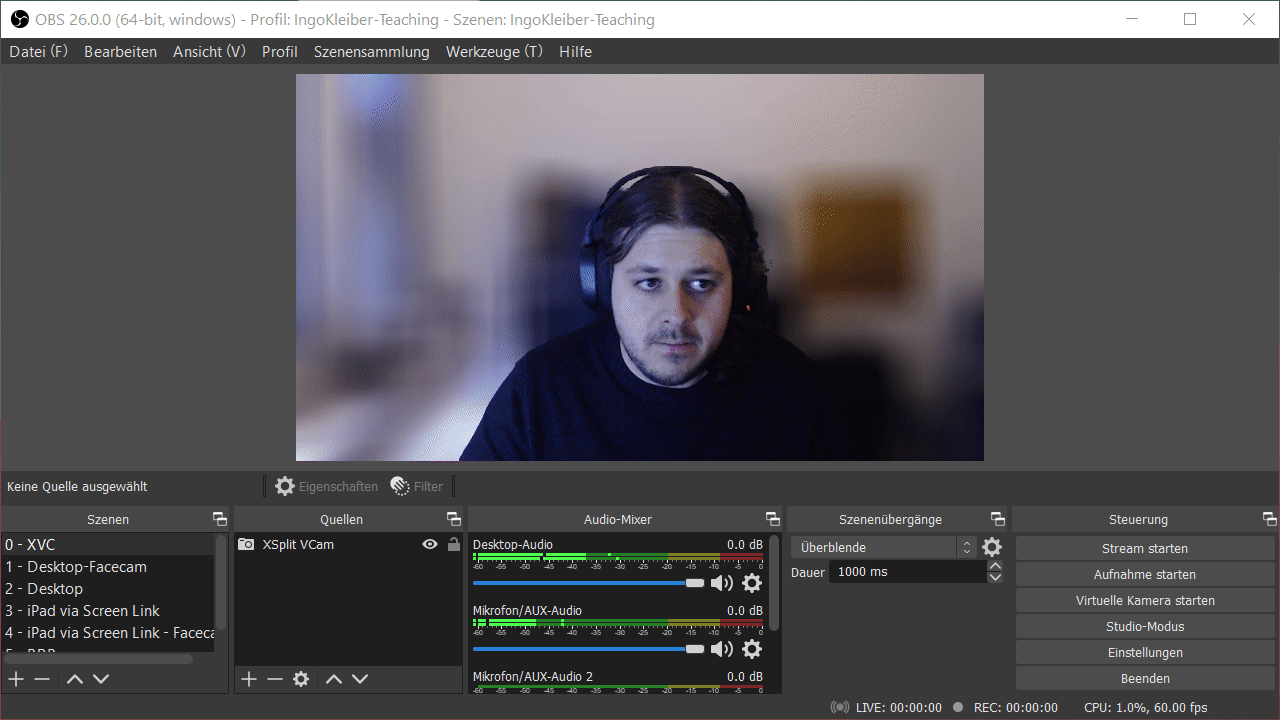
Switching between different OBS scenes. OBS’s output is then what I will use in all other tools.
Of course, I can now use OBS scenes and filters to control exactly how my video looks like. Using my Stream Deck, I am also able to swiftly switch between scenes. This, besides other things, allows me to switch cameras or temporarily disable my feed during a meeting without doing anything in the conferencing software.
While this works quite well for me, I have to mention that using these features requires quite a lot of computational power. Currently, I am running all of this on my Ryzen 7 3700X, 32 GB of RAM, and a GeForce RTX 2060 Super. While this hardware can easily handle it, the pipeline definitely takes away from my available resources. Also, piping a video signal through various tools and virtual webcam drivers will likely decrease image quality. While I do not mind this too much when using my webcam, this is the reason for not pushing my image quality-focused camera through that whole pipeline.
In some scenarios, especially when teaching, I also try to provide live (open) captions (subtitles). If you are interested in this, have a look at my article about using OBS to embed automatically generated captions to your webcam video.
Audio
In terms of audio software, I am not doing much. Nevertheless, since the NT-USB, at least for me, is quite noisy at times, I use noise reduction in all of my recordings and in OBS.
This is definitely an area in which I want to optimize my setup. One solution would be to use VB-Audio’s Voicemeeter to pre-process my audio before streaming or recording it. However, while the software is great in general, I do not want to overcomplicate my process by adding even more components.
Please note: While I personally like all the products I have mentioned in this post, I do not recommend you to buy any of these. There are plenty of alternatives for everything, and I strongly recommend looking at what works best for you!
-
In case you are interested in a cool, higher-end, setup, have a look at @FreyaHolmer’s streaming setup. ↩
-
I own a CZUR Shine Ultra scanner/camera, but I rarely use it. I strongly believe that a phone and a simple stand can reliably replace a document camera. ↩
-
Please be aware that TechSmith Camtasia does not officially support virtual cameras. XSplit VCam, however, is compatible with Camtasia up to the current 2020 version. ↩
-
I love what NVIDIA is doing with their NVIDIA Broadcast App, but I’m still missing a few features. So far, I have been very happy with VCam and its performance! ↩

Thank you for visiting!
I hope, you are enjoying the article! I'd love to get in touch! 😀
Follow me on LinkedIn