Quick Tip: Adding (Automatic) Open Captions to Your Webcam
TL;DR: If possible, add (closed) captions to your (live) audio/video content in order to make it more accessible and inclusive. Many tools, including Zoom, have features allowing you to add captions. If you cannot provide closed captions, baked-in open captions are a viable alternative. While automatically generated captions still leave a lot to be desired, they are better than nothing.
The short video above is a recording of a Zoom call. In it, as you can see, I added open captions1 to my webcam video. The automatically generated captions are not provided via Zoom (see below), but part of my webcam video itself.
Before discussing how this can be achieved, I want to briefly discuss why I am experimenting with automated captions for (live) video.
Captions make audio/video content more accessible and more inclusive.
The bottom line is that captions make audio/video content more accessible and more inclusive. I also want to stress that accessibility is not just about disability but more generally about making things usable by as many people as possible in the widest variety of contexts. To name a straightforward example: Captions allow students to follow a lesson even if they do not have access to speakers or headphones or if their current environment does not allow for sound. Besides, captions have been shown (see, e.g., Vanderplank 2016) to help in foreign language contexts, for example, if you have language learners listening or watching.
Unfortunately, and this goes beyond the topic of captions, a lot of inaccessible (or semi-accessible) content is still being created every day. In my role as an educator, I am part of the problem – while I generally try to make my materials and activities as accessible and inclusive as possible, I still often fail to do so. I have provided students with countless barely accessible PDFs, videos without captions, podcasts without transcripts, and slides that require you to see in order to understand them fully. Sometimes I simply do not have (make) the time, and sometimes I am just not aware enough. This is something I am actively trying to get better at!
I want to go back to the issue of captions now. If we consider the WCAG 2.1 as our guideline, captions are a must for prerecorded videos (Level A) and if, taken seriously, for live audio/video content (Level AA). Luckily, providing captions for prerecorded videos is relatively straightforward – although it usually increases the workload quite a bit, even if relying on automated tools.
Providing captions for live content (e.g., synchronous seminar sessions or online conferences) is a significant challenge as this usually requires transcribers who do the transcriptions (captions) live. This is good opportunity to point out that Zoom, and many other tools, provide various options for adding captions. For example, Zoom allows you to assign participants to provide captioning, add third-party services, and even rely on in-built AI-powered live transcription. These in-built features, in almost all cases, should be preferred to open captions.
Therefore, demonstrating open-captions using Zoom, as I did above, is not ideal as you should use these tightly integrated tools if available. That said, I have encountered many situations in which I could not use these tools to their fullest potential. Also, there are still many tools that do not provide this functionality.
The solution I will describe below is for precisely these situations. If you cannot provide closed captions (CC), for example, because you do not control the Zoom session, providing open captions is the next best thing.
One Solution: Automatic Open Captions Using OBS and Twitch Subtitles
Given everything that I have outlined above, we will now assume that we want to provide captions for a live session (e.g., a stream or a Zoom class), and we do not have the option of using tightly integrated closed captioning capabilities.
In this scenario, one viable option is to embed open captions right into your webcam video, as I demonstrated in the short video above. If we have a look at this short clip, there is a lot to be desired: There are a few minor mistakes in the transcription, and the captions are, at least at times, hard to follow given how they are presented. This is because I am relying on automatically generating captions. Also, I have a long way to go in terms of optimization the presentation.
Nevertheless, I decided to use such systems despite their very obvious shortcomings for now. I believe that they are far better than not even trying, and at least they highlight that accessibility technology is something that exists. I believe that it is also our responsibility to create awareness for accessibility issues, especially as educators.
It also seems necessary to point out that the captions above do not fully qualify in the WCAG sense. Within the guidelines, captions are defined as conveying “not only the content of spoken dialogue, but also equivalents for non-dialogue audio information needed to understand the program content.” Technically speaking, what I am describing here are interlanguage dialogue-only subtitles. At the same time, at least in many educational contexts, non-dialogue is seldomly absolutely necessary to follow a lesson or participate in an activity.
Of course, automatically generated captions are a tricky subject as well. Even though their quality has increased drastically over the last years, they are still far from perfect and certainly sometimes do not help at all. That said, in many situations, although having human-transcribed ones would be much better, they are the only viable options.
Aside from quality considerations, we should also keep in mind that automatically generated captions, at least as of today, usually rely on commercial services such as Google’s Cloud Speech-to-Text API. While I personally enjoy working with Google’s APIs, I firmly believe that more work needs to be done with regards to building open, independent, and locally runnable solutions. Furthermore, there is a risk of making this look easy and effortless when in reality, given the current technology, automatically generated captions should only be considered a “better than nothing” solution. Of course, hopefully, this will change in the years to come!
As a side note, I also want to point out that the same technology in principle can be used to provide translated captions (subtitles) in real-time. While this adds a further step of, possibly error introducing, automation, having subtitles available allows more people to participate. While this is, similarly to automated transcription, not perfect yet, machine translation has made a gigantic leap forward in the last few years. As can be seen in many cases, for example, on YouTube, automatically translated subtitles are already often good enough to understand a video.
Technical Solution
Finally, we reached the point at which I am going to discuss how to achieve what you saw above: Adding automatically open captions to a webcam video!
Generally speaking, the solution works as follows: Captions are generated using a web-application and added to an Open Broadcaster Software (OBS) scene. OBS is then used as a virtual webcam across applications (e.g., Zoom or BigBlueButton). Put very simply, OBS allows you to create scenes containing the video from your webcam as well as other elements such as captions that you can then use as a virtual webcam in most other applications.
While there are various solutions for the first step (generating captions), I am currently relying on Twitch Subtitles by PubNub (Stephen Blum). It’s a very simple and easily customizable solution. Also, the project, despite its reliance on PubNub, is open source and available on GitHub. Hence, the software can be run locally. In addition, Twitch Subtitles works well across many languages as it relies on your browser (currently only Google Chrome), using Spoken, to do the heavy lifting. Currently, the software is free to use as it serves as a demo application for PubNub.
Fortunately, the tutorial provided by PubNub is great, and you should be able to quickly get everything up and running.
Nevertheless, I want to outline the process briefly: You open the web-application in a browser, and it will transcribe your voice using the new Web Speech API and a cloud service. Of course, this browser window will need to stay open while you are using your camera. Using PubNub2, your browser is automatically connected to a (private) channel. Everyone in that channel will be able to see the generated captions in their browser. This allows us to share the captions between applications, i.e., your browser and OBS. Then, you join that same channel using OBS’s ‘Browser Source’. In other words, similarly to how other people could join your channel, a website displaying the captions, OBS can visit that website and display the content. Ultimately, OBS will simply add an overlay browser window containing the open captions to your video.
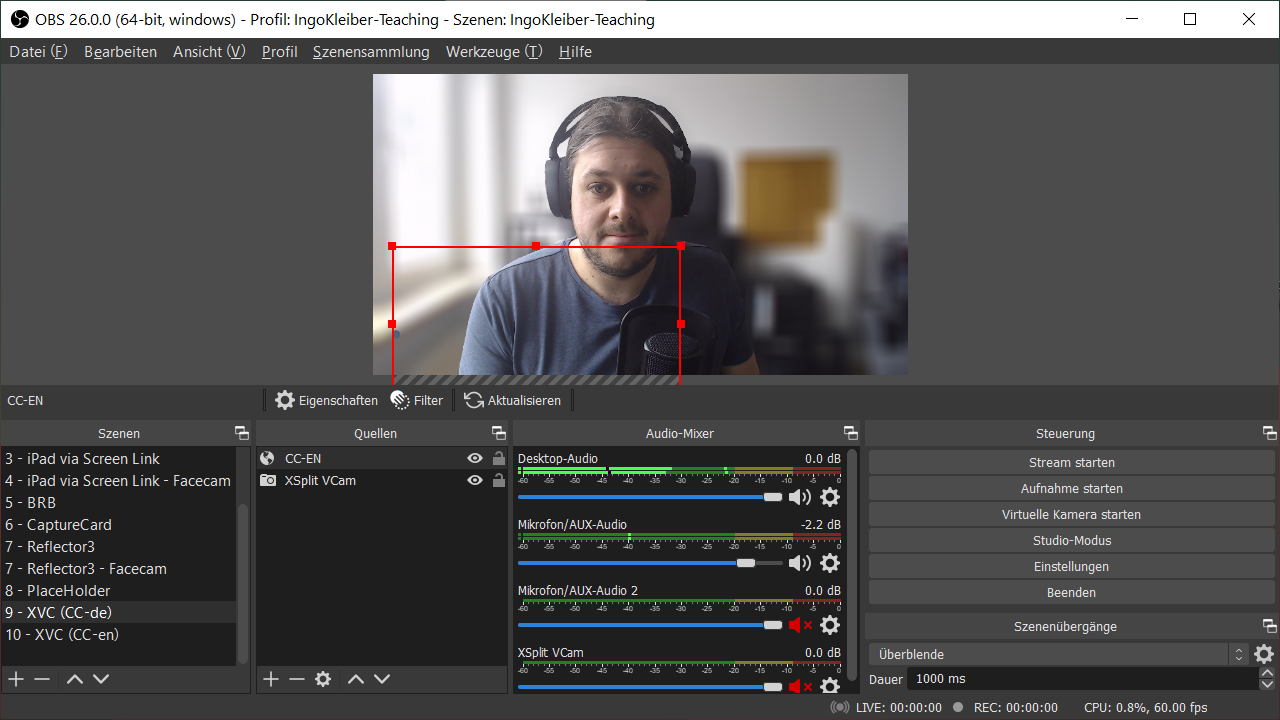
The red box is a browser window ultimately containing the captions. It is positioned so that the captions will appear in the bottom left corner of my video.
If you dislike how simplistic, and arguably also technical, this solution is, I would recommend having a look at Web Captioner. This is a very similar but more polished solution that also has various neat integrations with lots of platforms and tools (including Zoom, Twitch, and OBS).
BEWARE: In both cases, even if you run the actual software on your local machine, it is extremely important to be aware of the fact that the transcriptions are being generated in the cloud. I would definitely not recommend to using this kind of automated transcription for any sensitive material! Also, do not auto-transcribe anyone else’s voice without their consent – you would be effectively sending their voice data to Google without them knowing.
Open Captions vs. Closed Captions in Video Conferences
As I already discussed above, many video-conferencing solutions have tightly-integrated (closed) captioning functionalities. In contrast to open captions, which are ‘baked-in’ and cannot be controlled by viewers, they allow you to embed actual closed captions (CC) which can be adjusted and turned on or off by the viewers. This, of course, is not only better because it is more consistent across user experiences, but also because it allows users to adjust the captions to their needs much more precisely.
For example, Skype and Microsoft Teams support automatic real-time captions. In many cases, it is also possible to include captions, automatically- or human-transcribed, to a video conference. Zoom, for example, allows you to have both participants or third-party services providing captions.
Bottom line: If possible, you should always opt for standardized closed captions as they provide more flexibility and you do not have to modify the video itself. However, if closed captions are not supported or not an option, open captions are a viable option.
-
I am using the term caption to refer to any synchronized text alternative for audio content. Please note that the terminology is rather complex, and often the terms (closed/open) captions and subtitles are used interchangeably. However, usually, subtitles are meant for people able to hear the audio (e.g., translations), while captions are meant to ensure accessibility for viewers who cannot listen to the audio. Hence, captions also usually include information going beyond spoken dialogue. While so-called open captions are part of the video itself (‘baked-in’), closed captions can be configured as well as turned on and off by the viewers. Another terminological distinction is often made between interlingual subtitles (different language than is being spoken) and intralingual subtitles (same language as is being spoken). ↩
-
Technically, PubNub is a publish/subscribe messaging API. In many regards it works similarly to Google’s Pub/Sub or AWS’s SNS. It is used to sync the captions between different browsers and application. ↩

Thank you for visiting!
I hope, you are enjoying the article! I'd love to get in touch! 😀
Follow me on LinkedIn